Help and FAQ
for videos - visit our tutorials page
Helpful Topics Below
Top
- Unity Intercom Overview
- Unity intercom (self hosted) vs Unity Intercom Cloud
- Unity Server Requirements
- Unity Server Guide
- Unity Client Apps and Guide
- Basics of using the Unity Intercom App
- Connecting from outside a network (Port-Forwarding)
- Connecting I/O to Unity
- Interfacing Unity to Analog Intercom Systems
- Unity Connect
- How to back up and transfer to a new Mac computer
Unity Intercom Overview
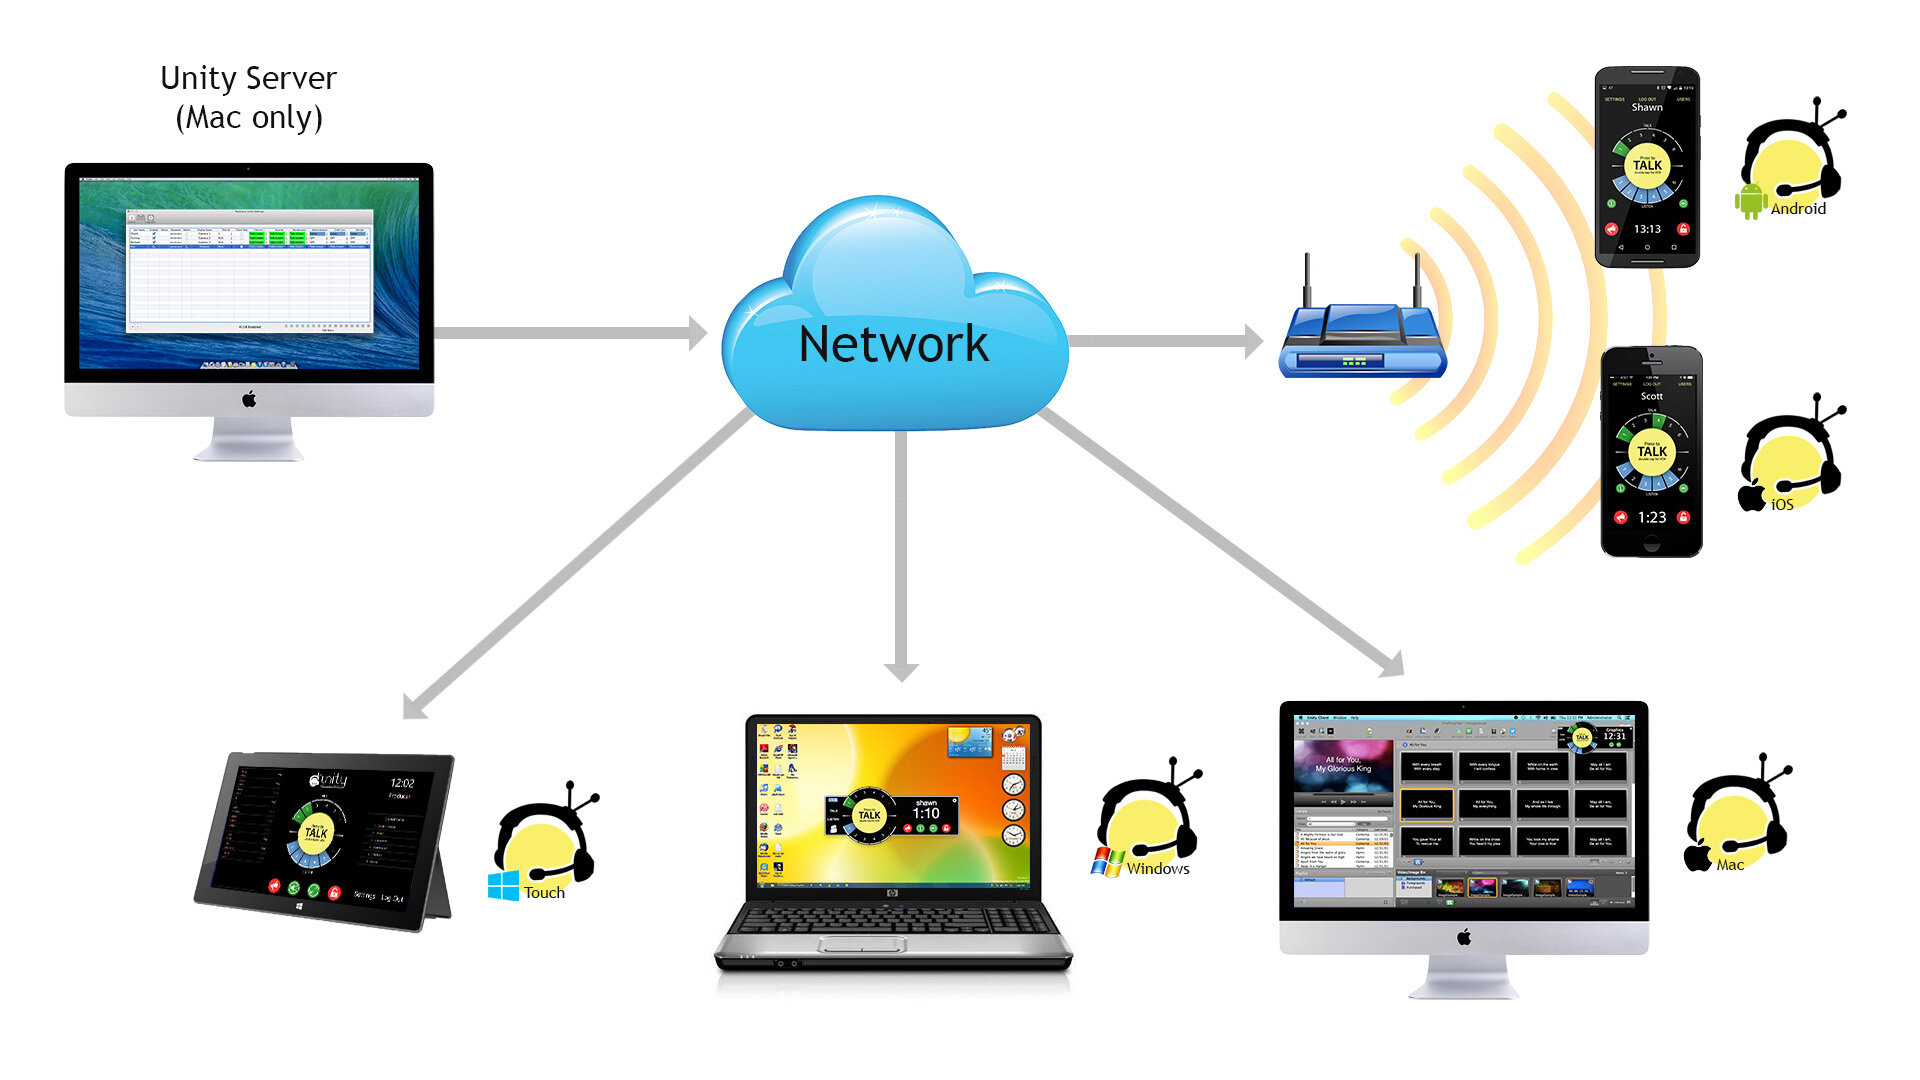
A Unity Intercom system is made up of two parts: the Unity Server software which runs on a Mac computer and the free Client Apps that run on your mobile devices.
Connect over WiFi or Cellular to talk and listen on independent PL channels or have private point to point communications with individual users. Unity can also integrate with existing intercom systems with up to 128 audio feeds - (Dante for example).
This allows Unity to be a very inexpensive stand-alone comms solution that can also be used to extend a traditional comm system anywhere in the world.
Unity Intercom (self hosted) vs Unity Intercom Cloud
First things first, there are two different options to use Unity Intercom: Self Hosted (your server) or Cloud Hosted (our servers)

Unity Intercom Server Requirements
Minimum deployment
2012 Mac - Intel i5 or Apple silicon, 8GB RAM
Large deployment 63+ concurrent users
Intel i7/i9, or Apple silicon M1, M2, M3, 8GB RAM
*Average Data Use for Unity Intercom and Connect
Individual audio streams in Unity are only about 50kbps on average (variable bit-rate encoding). 50kbps translates roughly to 6.2K bytes per second. Virtually zero during silence.
Unity Server Guide
Unity Client Apps
We have Unity clients for iOS, Android, Mac, and Windows. No matter which platform you're using, you can get in on the conversation with Unity. When a user logs into a Unity client they are presented with Listen or Talk selections for each of the intercom channels they have permission for. The large Talk button allows for easy access when you're busy paying attention to something else.
Users download Unity Clients on mobile devices and computers. Unity Intercom Clients are available for free from all major app stores.


Basics of using the Unity Intercom App
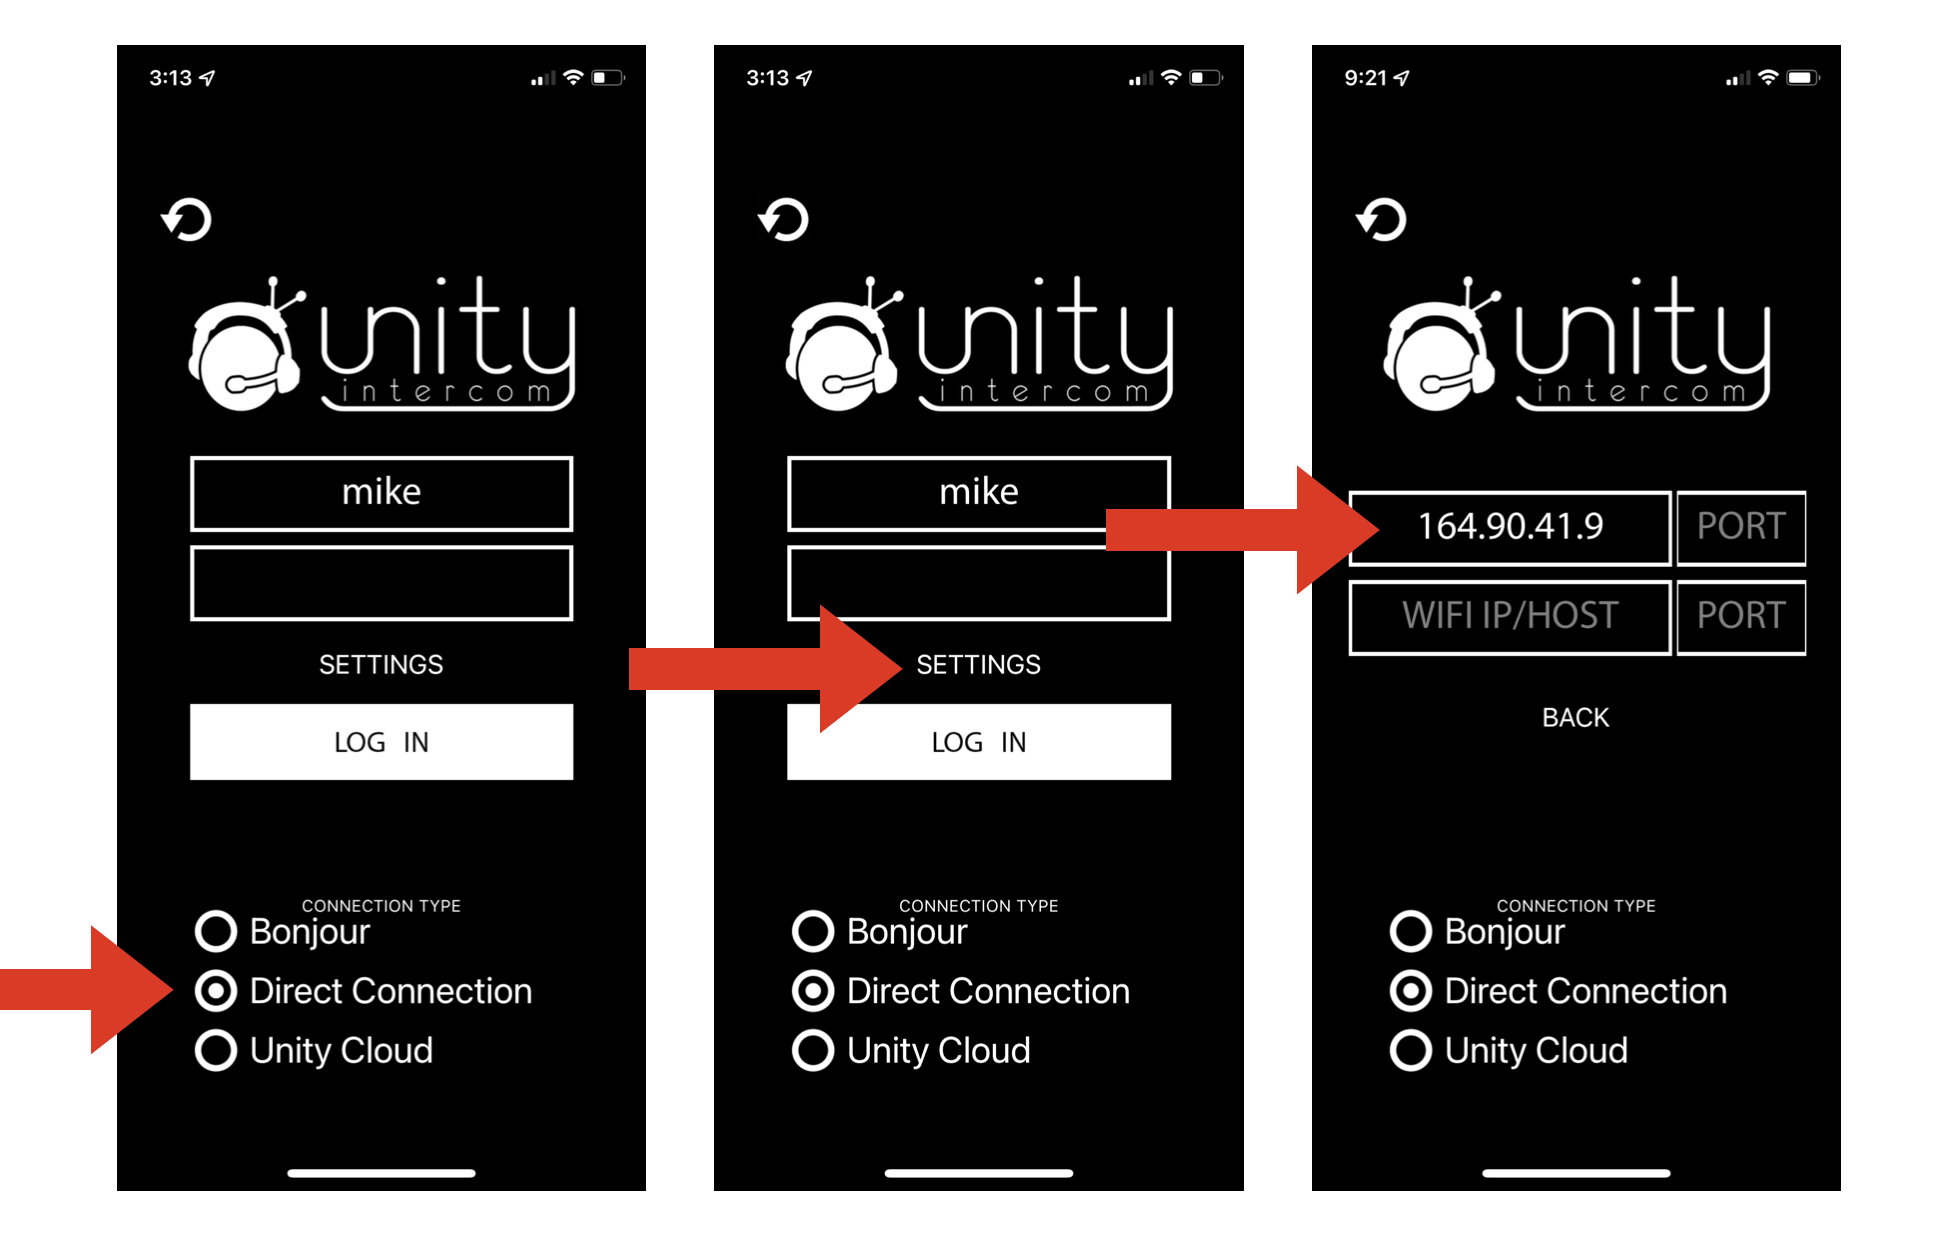
Enter the username and password you set up in your server. In most cases, you will select Direct Connection. Then click on Settings. On the settings page, you can input your IP address, generally you can leave the port field blank. Then log in.
Once logged in click on any of the 6 Talk (Green) and Listen (Blue) Channels to activate that channel. The Yellow bar under each listen number means that there is currently audio present on that channel. You push and hold the large center yellow Talk button to talk back down the channels you have selected. Tap the green info icon on the left to bring up the Channel Legend.
Tap Users in the upper right to get a legend of all current users. Users that are actively listening will move to the top of the list and highlight in white. Press and hold on a user to send them a private Direct Talk.
Unity over WIFI
Unity Intercom should be running on a dedicated SSID on 5GHz, ( 5GHz is best for higher traffic environments ).
Direct IP is the preferred method, this is also how users must log in if wanting to connect from outside the network. *Note - This usually requires Port-Forwarding.
Log in procedure -
Connect via Direct Connection.
Click on the Settings link and enter the local or global IP address of the Mac running the Unity Server into the Main/IP field. Then click back.
Enter the Username and Password.
Connecting from outside the network (Port-Forwarding)
The best way to experience Unity is to allow users to connect from anywhere in the world from cell signal or outside network WiFi. This will make for a very flexible and far more powerful Unity Intercom system.
For example, this is how TV station producers are communicating with news production crews and reporters out in the field, on cell data.
Standard Unity requires TCP and UDP.
You will simply need an accessible outward facing IP address or Port-Forwarding rules in the router. By default, Unity uses port 20101 for TCP and UDP but you can use any port you like. Simply create a forwarding rule in the router firewall. One for TCP and one for UDP or one containing both, routing outside traffic that hits port 20101 to the internal address of the Mac.
This is how users are able to be on Unity Intercom from anywhere in the world.
Once port-forwarding is set up, below is the log in process.
Log in procedure -
Connect via Direct Connection.
Click on the Settings link and enter the global IP address of the Mac running the Unity Server into the Main/IP field. Then click back. ( to find your global IP just Google search, “what is my IP address?” from the Mac computer )
Enter the Username and Password.
Connecting I/O to Unity
Unity will work with any Core Audio compliant audio I/O device and of course is Dante audio friendly by simply using Dante Virtual Sound-card.
To integrate Unity with a traditional third-party comm system, the Unity Server will require an audio I/O device or Dante Virtual Sound-card and the Unity I/O License from Unity.
This is how you can send audio feeds, mix minus/IFB and everything else into the field and anywhere in the world.
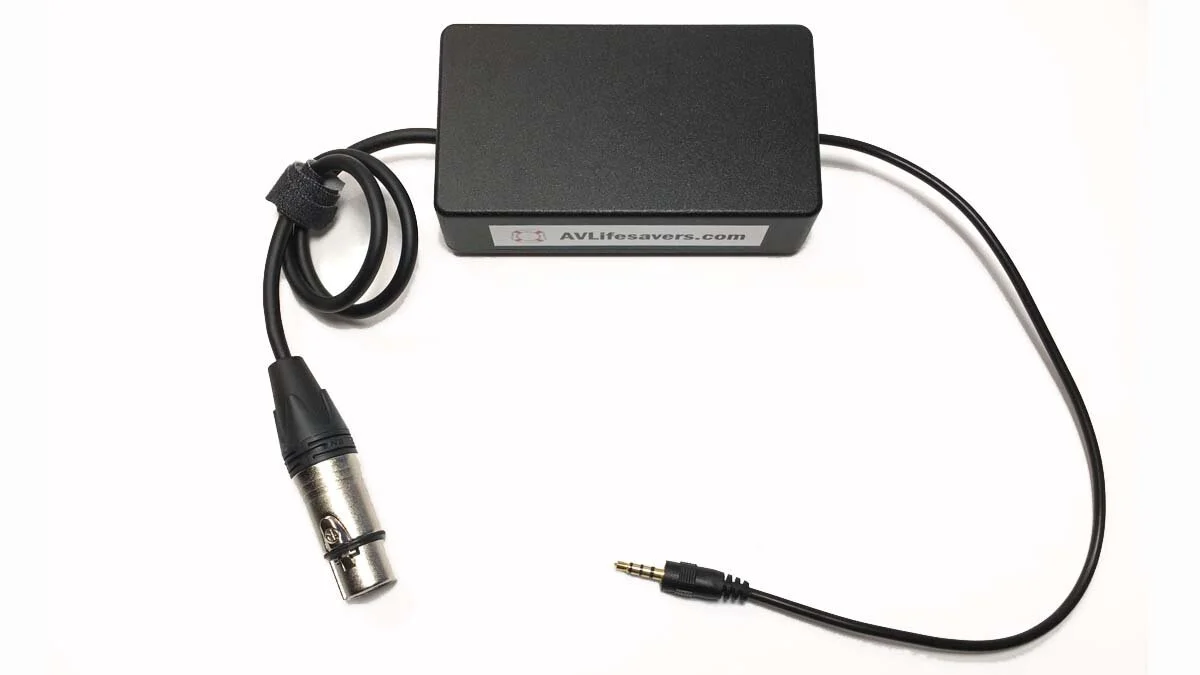
IMPORTANT - If there is not a way to null the audio to prevent Unity from getting it’s own audio back into the Mac ( basically if not using a Frame ) then we recommend the Studio Technologies Model 545 Dante to Dual-Party Line interface with auto nulling.
Please note! For (RTS) The Model 545DR Intercom Interface is the current replacement product for the now discontinued 45DR Intercom Interface.
This will take analog partyline in and output Dante. Dante Virtual Sound-card will need to be installed on the Mac. If using a Frame and not needing special nulling considerations, then you can use whatever I/O device you want.
If you have a frame like an RTS Adam you can use any I/O device you want. Motu 16A is one of the best units in the field for 24/7 reliability.
If you need audio nulling ( standard party-line systems non matrix frames. ) See below

* Clear-Com Systems use Studio Technologies Model 45DC
Please note: For (RTS) The Model 545DR Intercom Interface is the current replacement product for the now discontinued 45DR Intercom Interface.
Important Note about the (Model 45) in the Unity Channels page you may need to lower the dB level on the output to about -18 in order for the auto nulling feature on the 45DC to work properly.
For I/O devices not using Dante and not requiring audio nulling we recommend the Motu 16A, the Motu 8A and the Focusrite Clarett 8 Pre but many I/O devices will work just fine.
Read this post for details: Click Here
Other helpful connectivity products:
AVLife Savers

Unity Intercom IFB and Program Audio
Interfacing Unity to Analog Intercom Systems
This illustration shows Unity connecting to an RTS Frame that is set up as a party-line sending audio to a USB-C I/O device.
This illustration shows Unity connecting to a traditional Party-Line system ( Non Frame ) and converting to Dante Audio. Feeds are managed on the Mac via Dante Controller and Dante Virtual Sound Card.
